ShopDreamUp AI ArtDreamUp
Deviation Actions

Donor
Bonus pictures (sometimes)
"Multiple Angles" pictures (1 per a month)*
*Images that have been posted on this tier for more than 2 months will be posted on deviantArt.
$10/month


Suggested Deviants


Suggested Collections


![[MMD to Blender] Tutorial 1: The Basics](https://images-wixmp-ed30a86b8c4ca887773594c2.wixmp.com/f/b58ee756-7755-4c5a-a4e5-26b7f54c5ff9/d6vigyk-792e2cdb-eb2e-4bac-9e72-f173d77a88e5.jpg/v1/crop/w_184,h_184,x_0,y_184,scl_0.25555555555556,q_70,strp/_mmd_to_blender__tutorial_1__the_basics_by_hanatsuki_kimiko_d6vigyk-92s-2x.jpg?token=eyJ0eXAiOiJKV1QiLCJhbGciOiJIUzI1NiJ9.eyJzdWIiOiJ1cm46YXBwOjdlMGQxODg5ODIyNjQzNzNhNWYwZDQxNWVhMGQyNmUwIiwiaXNzIjoidXJuOmFwcDo3ZTBkMTg4OTgyMjY0MzczYTVmMGQ0MTVlYTBkMjZlMCIsIm9iaiI6W1t7ImhlaWdodCI6Ijw9MzYwMCIsInBhdGgiOiJcL2ZcL2I1OGVlNzU2LTc3NTUtNGM1YS1hNGU1LTI2YjdmNTRjNWZmOVwvZDZ2aWd5ay03OTJlMmNkYi1lYjJlLTRiYWMtOWU3Mi1mMTczZDc3YTg4ZTUuanBnIiwid2lkdGgiOiI8PTcyMCJ9XV0sImF1ZCI6WyJ1cm46c2VydmljZTppbWFnZS5vcGVyYXRpb25zIl19.hyqyE9s6FW6TvmUiR2e5w6t9YZA7q5NKCSRumfwOIEk)
![[MMD to Blender] Tutorial 1: The Basics](https://images-wixmp-ed30a86b8c4ca887773594c2.wixmp.com/f/b58ee756-7755-4c5a-a4e5-26b7f54c5ff9/d6vigyk-792e2cdb-eb2e-4bac-9e72-f173d77a88e5.jpg/v1/crop/w_92,h_92,x_0,y_92,scl_0.12777777777778,q_70,strp/_mmd_to_blender__tutorial_1__the_basics_by_hanatsuki_kimiko_d6vigyk-92s.jpg?token=eyJ0eXAiOiJKV1QiLCJhbGciOiJIUzI1NiJ9.eyJzdWIiOiJ1cm46YXBwOjdlMGQxODg5ODIyNjQzNzNhNWYwZDQxNWVhMGQyNmUwIiwiaXNzIjoidXJuOmFwcDo3ZTBkMTg4OTgyMjY0MzczYTVmMGQ0MTVlYTBkMjZlMCIsIm9iaiI6W1t7ImhlaWdodCI6Ijw9MzYwMCIsInBhdGgiOiJcL2ZcL2I1OGVlNzU2LTc3NTUtNGM1YS1hNGU1LTI2YjdmNTRjNWZmOVwvZDZ2aWd5ay03OTJlMmNkYi1lYjJlLTRiYWMtOWU3Mi1mMTczZDc3YTg4ZTUuanBnIiwid2lkdGgiOiI8PTcyMCJ9XV0sImF1ZCI6WyJ1cm46c2VydmljZTppbWFnZS5vcGVyYXRpb25zIl19.hyqyE9s6FW6TvmUiR2e5w6t9YZA7q5NKCSRumfwOIEk)
You Might Like…


Description
Go here --> [link] <-- for the tutorial.
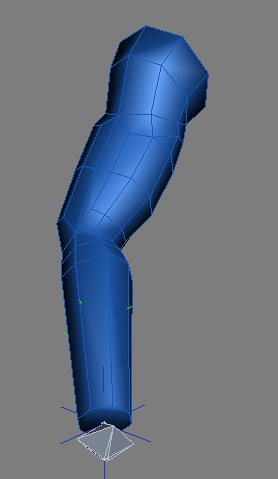
A really quick and sloppy tutorial on making muscles bulge automatically, with 3dsmax.
--
edit:
I thought I would mention that the whole reaction manager driven morph target thing in here is useful for a LOT more then just a muscle bulge.
In this tutorial, I make a morph target for the arm where the bicep is enlarged, and when the bone bends, the morph comes on.
This can be used for any kind of adjustment/fix to the rig, not just muscles.
You could make a morph for a skirt to deform better when legs are bent.
You could make a morph for wrinkles on clothes to bunch up when an arm is bent.
you could make a morph for... Well, any specific change you need to happen, when something bends, that doesn't happen automatically as apart of the skin.
Another option is to use the modifier Skin Morph, however I'm not terribly fond of it, because I don't feel I have nearly enough control with it.
There are LOTS of things that you can apply these techniques towards.
In this example, the value of the ExposeTM's bone's local rotate value is the controller - the Driver, or the Master.
The value of the morph target is the driven or the Slave. But anything can be the slave, not just a morph target.
If you have a very dense mesh (lots of geometry) instead of a morph target, you could control the opacity of a displacement map.
Then the black-and-white displacement map, will create geometry displacement when the opacity is turned up.
Lots of things can be done with this sort of technique.
Image size
278x479px 43.7 KB
Comments13
Join the community to add your comment. Already a deviant? Log In
Could you give me couple of tips or pointers on how to integrate Zbrush sculpted morphs to this kind of appliance?
I'm currently studying game design and we are going over skinning, rigging and morphs at the moment. I read the article on CGI Society sometime ago about how the facial fidelity in Last of Us was achieved by complimenting the rigged expression with sculpted morph.... but I'm uncertain of how to achieve this kind of things in Max. Would I go about it by first making the base expression in Max, then taking it to Zbrush for sculpt, then bring the normal map to the base mesh and use that for the morph or should I try to just morph the textures?
Any insight you could give on this would be valuable!
Cheers